Building description
Building description
Composition
The house is a two-storey semi-detached dwelling with side entrance, built c. 1922. The four-bay front façade features a projecting bay, capped by a gable with open pediment render detail, which is defined by an in-situ concrete roof barge and horizontal broken cornice at eaves level. There is a canted timber-framed bay window with timber cornice and lead roof to the ground floor level of the projecting bay. To the side of the house, an entrance door and adjoining stairs window are sheltered by a timber canopy supported by brackets shaped as back-to-back scrolls. There is a contemporary full-width flat-roofed extension to the rear.
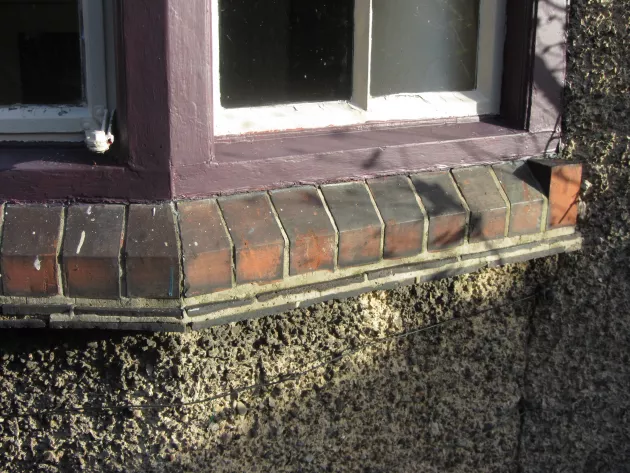
The walls are mainly finished is a roughcast lime render on what appears to be a sand-cement basecoat on a stock brick solid wall. Brick details include a three-brick stretcher-bond band at eaves level, bullnosed brick cills and brick quoins to the projecting front bay.
The slated roof is hipped on all sides excluding the gable feature. Roof slates are original. Rainwater goods are the original cast-iron in generally good condition.
Excluding the windows of the single-storey extension to the rear, all windows (including the French doors) are multi-paned, single-glazed mild steel metal windows in rectangular or square openings. First-floor window heads finish tight to the underside of the eaves. The French doors, which date to 1972, replaced casements but marry well into the overall composition as they are made using the same metal profiles and reused brick sills.
The simple massing, arrangement of windows and patio doors, and the careful detailing with classical references gives the house a more sober, formal character than many nearby houses.

The render which has been in place since construction (in 1922) is beginning to show its age particularly at the base where plants ensure a higher relative humidity close to the surface. A question arises as to whether a matching finish could be achieved today, given its unusual aggregate mix of pebbles and shells.
The entrance gate is a direct copy of the original though it has been made taller. The paving is recent. The garage and rear extension date to the 1970s shortly after the current owners bought the house.
Interior as built
The original house was 8.2m wide and 7.6m deep internally, giving an area of ~125 sqm over two storeys (if one also includes the external store and toilet built within the rear wall). Ceiling heights are 2.46m downstairs and 2.66m upstairs (given bellcast ceiling at perimeter). The 1972 extension added 3.5m more (across the full width) to the rear and a 17 sqm attic conversion bringing the overall area to 172sqm in size: a large suburban house. A large garage and garden store were also built at the same time.
The original plan is atypical of the majority of Dublin houses being entered from the side, with a quarter stairs behind the entrance door: this allows two reception rooms to span the width of the façade and gives additional privacy at the hall door. The original three room-plus-ancillary plan can still be read. The hall door was at the rear of an open recessed porch (the outer door was added later).
The extension unified the front reception rooms, used the stair cupboard to give access to what was now an internal downstairs toilet from the rear corridor, turned the old kitchen into a new extended diningroom and opened to it a long open plan kitchen that addressed the large rear garden and gave internal access to the new garage at the north end. The first floor was not extended: three bedrooms take up the front four bays; and the stairwell, bathroom, hot press and rear bedroom (which is open plan to the attic conversion above) occupy the rear. A large part of the attic was made in to a mezzanine open to the rear bedroom below.
The ground-floor construction, which has not changed, is composed of timber floorboards fixed through a bituminous coating (which acts as a damp proof membrane) to battens cast into a breeze slab below. In places, the metal fixings have stained the surrounding timber surface black. Internal stacks and adjoining walls are made of stock bricks. Other internal walls on the ground floor are made of 3” (75mm) breeze blocks, all lime plastered. Non load-bearing walls upstairs are timber frame with lathe and lime plaster. The original ceilings are still in use and must represent a relatively early use of plasterboard. The house is thus an interesting mix of traditional and non-traditional constructions.
The house appears to have been continuously maintained to a high standard and retains a high level of original features in good condition. These include metal windows and internal and external doors with ironmongery, skirting and architraves, stairs and balustrades, floorboards, floor tiles in porch and hearths, ceilings and simple running cornice in hall and front reception rooms, the cast-iron range, the main fireplaces and small tiled bedroom fireboxes and hearths.
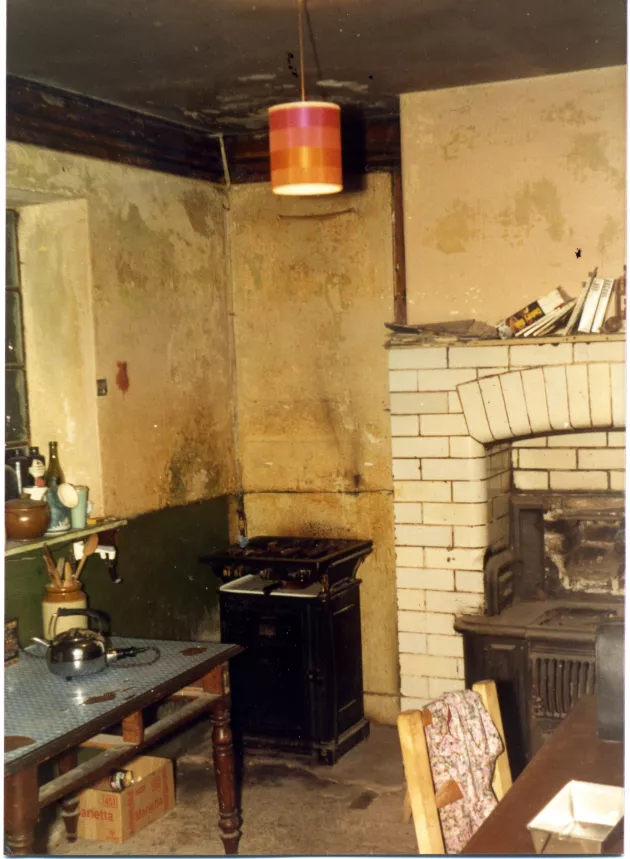
The house was advertised as ‘labour saving’ in 1922 (see image of the advertisement launching the sale of the houses). A black-leaded, coal or coke-fueled cast-iron range which was used for cooking and heating in winter was a key selling point. Other features that must have greatly eased workloads in 1922 included electricity, hot water supply to taps from an electrically heated cylinder, and piped gas to each of the bedroom fireboxes. It would appear that only the supply to the master bedroom was used as a cast-iron gas fire is still in place. Electric bells in most rooms rang in the old kitchen.
Changes since construction, existing condition
|
Item |
Description & comment |
Heritage Impact
|
|---|---|---|
|
Internal wall insulation |
The north facing external wall of the front corner bedroom was insulated in 1972 with 37mm of expanded polystyrene between battens, with a polythene vapour barrier and plasterboard finish. The homeowner didn’t insulate the front wall at the same time because he didn’t want to lose the rounded corners of the window reveal. The external wall of the middle front bedroom was recently insulated with 75mm insulated plasterboard (with a resulting loss of the curved reveals). |
Low As there were no significant wall features or covings at first floor level the visual change was negligible
|
|
Rear extension wall |
In 1972 the (south) party wall and the (east) garden wall of the rear extension were built as cavity walls with a 50mm void. Four years later, 50mm of expanded polystyrene external wall insulation was applied to the garden wall and some years later its cavity was filled with loose fill bead insulation: a very early example of an energy-efficient retrofit.
|
Medium The floor plan configuration was changed |
|
Rear extension flat roof |
Roof membrane on chipboard deck on 50mm EPS on void (both between joists) on 25mm PU board slabbed under joists and plasterboard ceiling |
Medium As above |
|
Windows |
On the first floor, all frames, mullions and transoms are original, at the front ground floor they are replacements dating to 1972 due to corrosion. The homeowner used galvanized mild steel of the same metal type of profile (W20) as the original ungalvanized mild steel windows thereby ensuring that the new windows to the bay and the two double leafed french doors (that replaced casements) married well with the original architectural scheme.
The front first-floor windows under the gables were later refurbished using parts taken from the original kitchen window (which had been retained for this purpose). Like the ground-floor windows, they did not benefit from the shelter the eaves afforded the other windows.
|
Positive The owner has made a positive effort to conserve and retain the original steel windows |
|
Roof |
The roof slates, battens and the original parging plaster were not removed. |
None |
|
Pitched ceilings with plasterboard finish |
The homeowner has admitted to insulating however and wherever possible during works. 2” of expanded polystyrene (EPS) board was pushed down the pitched void between plasterboard and remaining parging plaster from above (the difficulty with this is keeping the insulation tight to the top face of the plasterboard) |
None |
|
Pitched ceilings with timber finish in bedrooms |
2” of EPS was used in the same way as above and another 1” EPS fixed between battens to take a pitched pine T&G boarding (with shellac or paint finish). The boards had been salvaged from the conversion of the Ballsbridge Masonic Girls’ School (Thomas Prior House) to a hotel.
|
Low No significant impact on house |
|
Pitched ceilings with timber finish in attic level mezzanine |
Because this was a conversion of an attic void the homeowner was able to fit 5” of mineral wool and 1000 guage visqueen membrane with timber cladding finish
|
None |
|
Intermediate floor between mezzanine and bedrooms |
The joists were strengthened and the void deepened by adding joist strengtheners. 6” of mineral wool were fitted here: this improved the acoustic privacy between the mezzanine and rooms below |
None |
|
Boiler & heating control upgrade |
The original heating system, which consisted of open fires and range downstairs, gas heating upstairs in small tiled hearths and separate immersion heated hot water cylinder, was replaced by central heating in 1972. This was then turned off in 1976 when gas prices rose and multi-fuel stoves installed in the old kitchen and living room. The central heating was re-started in ~2004. |
Low |
|
Boiler replacement |
In 2013, a new gas boiler was installed in lieu of a previous modern gas boiler in the same location under the stairs. |
None |
|
Continuous maintenance |
Due to continuous maintenance, many items such as windows that might have failed have remained in continuous use. |
Positive
|
|
Draught stripping |
This was carried out under the current owners but is in need of renewal or first installation in many places. |
None |
Appropriate size of extension
The extension is relatively modest in size being a 3.5m wide open plan space added to the rear for the full width of the house. The original kitchen (now a dining room) still receives some amount of natural light; however, its evening use means that reduced lighting is not a problem. Because the extension is not overly large, the original and extended parts of the house continue to be used equally. Compare this to the issues highlighted in over-extended houses discussed in the essay ‘How the way we use our traditional buildings has changed’ [link to follow].
Shelter and maintenance
The windows of this house are a good example of how architectural design can create conditions that reduce maintenance requirements. The deep eaves of the house shelter the firs- floor windows located directly below them to such an extent that they have been less exposed to window and driving rain. While the airtightness test has shown they are not as airtight as modern windows, they have lasted 92 years without need of significant maintenance.
Ventilation and air infiltration
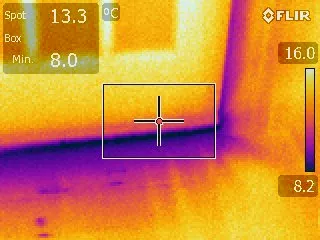
See photographs which show air leakage and thermographic images that reveal some of the areas where the house underperforms.
On a still day in October 2013, the house’s air leakage rate was measured as 13.62 m3/m2.hr (in accordance with EN 13829). This test involves temporarily blocking purpose-provided ventilation and flues and de-pressurising the enclosed volume 50 Pascals below external air pressure. During the test, the only air movement from outside to inside is air infiltration through gaps and cracks. The result obtained is one of the poorest of all the case studies measured. The value corresponds to 0.68 air change per hour (ACH) at atmospheric pressure. While this infiltration may therefore be considered a key part of overall ventilation strategy it should be remembered the air leakage is controlled by external air pressure and wind speed - not occupant need. Higher wind speeds could remove expensively heated air quickly and result in draughts. The fact that the house is quite sheltered is an incidental feature that may therefore play a higher role in thermal comfort than usual.
An intermittent fan in the bathroom (switch operated, independent of the room light), another in the downstairs toilet (linked to light switch) and a cooker hood (used regularly) are intended to function as the extract side of occupant ventilation. As the homeowners have always been aware of the potential vulnerability of metal windows to surface condensation they always use the bathroom extractor and always clean away any condensate that forms. However, without question, the main air extraction taking place is up the many open flues of the house. As is all too common, the homeowners are dependent on gaps and cracks for the supply side of occupant ventilation and on flues for most of the extract side. In common with many such houses, the house is surely under-ventilated at times and over-ventilated at others with a negative impact on indoor air quality; however, it must also suffer from an inability to retain expensively warmed air. Thermal convection is the quickest way for a dwelling to lose heat and is the main culprit in dwellings where occupants complain of losing heat soon after the boiler shuts off. Clearly, external air pressure and wind speed are the main drivers of this ad hoc air supply – not occupant need.
It would be far better to make the building envelope more airtight to conserve heat while also installing a ventilation system that is designed for this specific house featuring humidity-triggered supply air vents in ‘dry’ rooms and modulating continuous extract vents in ‘wet’ rooms, ensuring that after installation the system is independently commissioned – too many ventilation systems get installed and never function optimally.
There are three significant areas that account for much of this poor result:
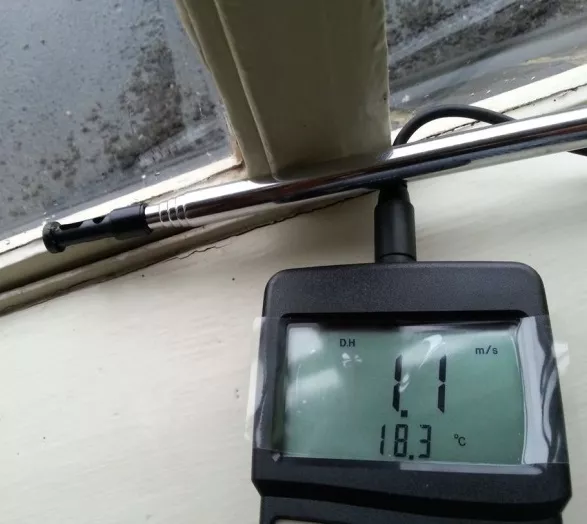
- According to the test report, all the metal windows leak, many at the level shown in Figure 4 below (i.e., 1.1 – 1.2 m/s). This is a high level of leakage and is of concern due to the length of junctions over which it occurs.
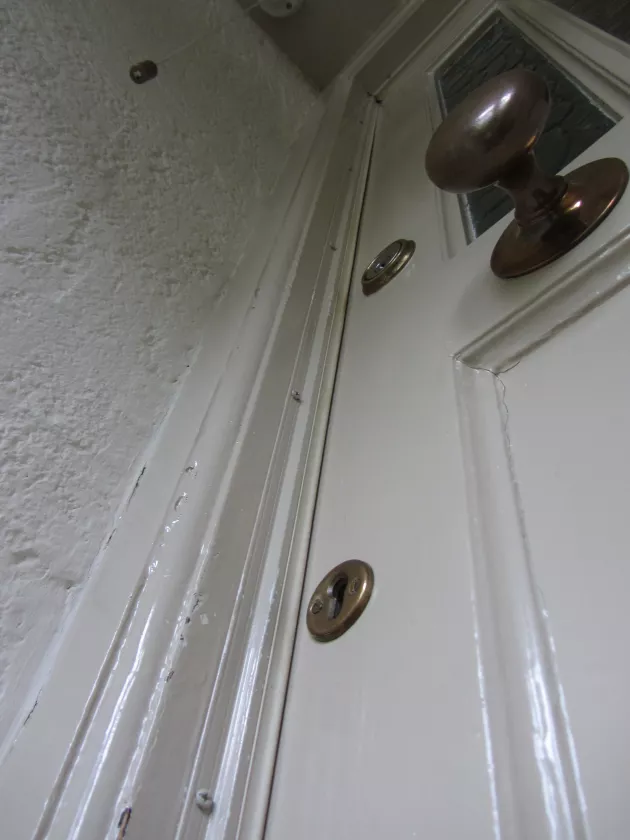
- The worst single value was at the base of the hall door: 4.9 m/s. This value is so poor it suggests no obstruction to significant laminar air flow from outside. On examination, it can be seen that there is no threshold draught stripping and that the pressure seals fixed to the door frame on either side are no longer engaging with the door leaf (see Figure 3 above and Figure 5 below). Interestingly, the value was obtained with the outer porch door closed: one would have assumed the outer door would have moderated the air infiltration.
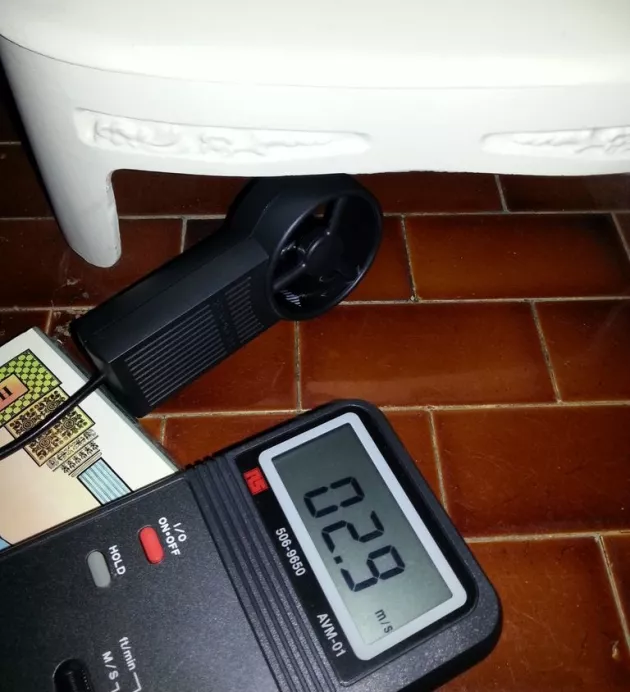
- Another poor reading was across the full width of the base of the original gas heater in the main bedroom: 2.9 m/s. Note the area over which the leak occurs is important.
Roof & parging plaster
The roof has never been re-slated and from the outside appears in good condition. As per standard practice at time of construction, a lime mortar was applied to the underside of the slates and battens as a parge coat. These coats helped counteract wind suction and acted as a second line of defence (before roof underlays existed). The homeowner recalls that some of the lime parging plaster had already started collapsing by the time he converted the attic and insulated it. He removed only what he had already fallen where accessible. No doubt it has continued to fall since the attic conversion and insulating works listed above were completed. This is concerning for many reasons: the plaster can block the void that should allow ventilation to encourage evaporation above the pitched insulation; as it is hygroscopic it can hold on to any moisture present wherever it gathers; and its collapse leaves the roof without a second line of defence against (a) rain water inundation that might occur due to a tile slippage or crack and (b) wind suction.
By the 1940s, bituminous felt (a woven jute or hessian matt impregnated with bitumen) was being used in all pitched roof developments below tiles or slates, these can last much longer and in many cases early felts are still in good condition. Unfortunately, there is no cheap fix with parging plaster: it is an example of an historic material that has a limited lifespan. The modern tendency to have higher room temperatures and greater amounts of moisture production than in the past, hasten the demise of the parging in roofs where a modern airtight, vapour control layer is not in place. Whenever found in anything less than perfect condition (which is to be expected) it should be removed fully and replaced with a taped modern breather membrane. In cold attics (i.e., where the insulation is on the attic floor) a temporary fix can be availed of by fixing the membrane to the underside of rafters (junctions at bracing and purlins are difficult to resolve). The advisable approach is to install the membrane from above which means removing and replacing slates or tiles and renewing slating battens. The fact that this work can allow high-quality installation of insulation in areas of pitched ceilings (between and below the existing joists) or for the whole roof of detached houses to be insulated between and above joists can be significant compensations for the extra cost of that work.
Areas of poor thermal performance
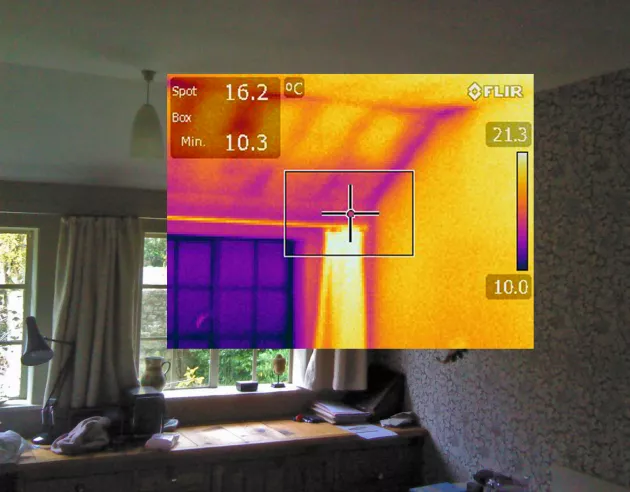
The thermograms (see images) were taken in November 2014 and are shown beside or on top of visual images.
The first thermogram shows the pitched ceiling in the primary bedroom which had been insulated with 2” of expanded polystyrene placed down each bay from the attic above. The repeat thermal bridges of joists can clearly be seen between the warmer colours of insulated ceiling. The decline in temperature in the lower 40% of pitched ceiling is most likely evidence that the homeowner wasn’t able to keep the insulation boards tight to the plasterboard the whole way down each bay - cooler air is migrating between insulation and plasterboard. The darkest areas appear to one side of the bottom of the joists which may suggest an accumulation of parging between the plasterboard and insulation or an airpath. Insulating pitched ceilings where roof tiles and ceiling plasterboard remain in place is challenging due to the narrow dimensions and competing requirements for roof ventilation, good insulation and airtightness.
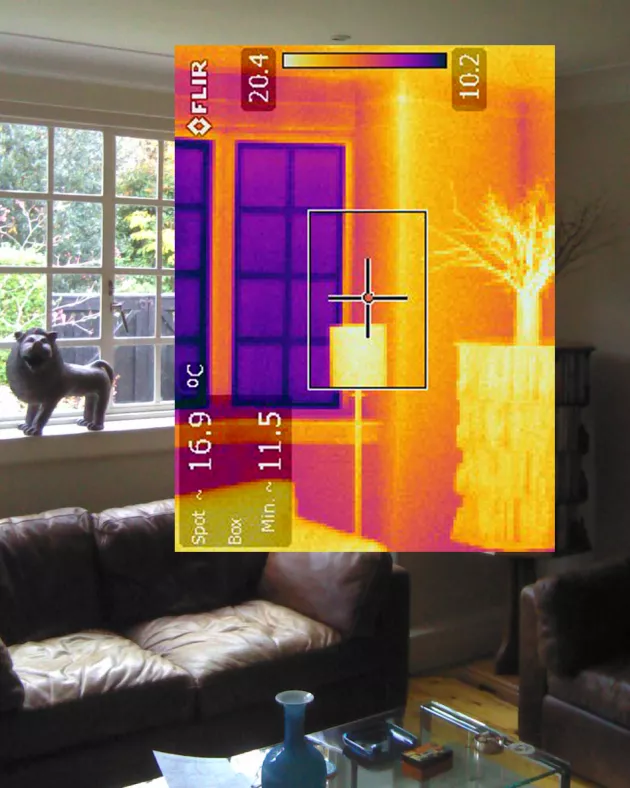
Both this and the second image (taken mid-morning) show clearly how the metal windows are the coldest surfaces in the room. In the living room thermogram, two shades of blue can be detected on areas of window frame: the darker shade may relate to cold air ingress.
The remaining thermogram (taken on a November night and the daytime photo paired with it) show the hall door viewed from inside. The temperature and vector of the cold air coming under the door (at atmospheric pressure) is clearly captured in colour (see temperature scale to side of image) and supports the findings of the air pressure test. The visual image shows that a brush seal is in place – it’s simply not working. The installation of a small profiled aluminium sill with pressure gasket would greatly reduce air infiltration here. The pressure seals fixed to the porch side of the hall door frame (visible in Figure 3) also need refitting: they are no longer engaging sufficiently and have lost their elasticity due to age and over-painting.
Context
Ailesbury Gardens is a quiet residential road running south-south-west from Sidney Parade Avenue to Ailesbury Mews. Six pairs of semi-detached houses, including the case study house, line the eastern side of the road facing a wide planted verge and the rubble wall abutment of Sidney Parade train station on the other. The presence of large trees and well-kept hedgerows gives the area a pleasant aspect.
The houses of surrounding roads are almost entirely semi-detached and fall into two clear groups – the Edwardian houses with redbrick faced solid walls and the Inter-War houses that feature either roughcast render over two floors or roughcast render over red brick. Bays with ornamented gables, canted or apsed bay windows and the use of string courses and quoins are common features in both eras.